How to make a Forensic Image Bootable in VirtualBox for Free
- 05/06/2018
- Posted by: Alistair Ewing
- Categories: Investigative Techniques, Uncategorized
Thank you for visiting this post hope you find it useful. Please email expert@compute-forensics.com for assistance in lab implementation, investigation, data collection, consultancy or anything else.
Introduction
This ‘how to’ is a simple guide to virtualise your forensic or test disk image file in Windows without converting it, directly with VirtualBox, forensically as not to change the image but to save the IO writes to a temporary location.
Why would you want to Virtualise a Forensic Image?
Examining from outside the native operating system and including your image for processing in tools such as Autopsy, FTK and X-ways are all well and good, but it can lead to dreaded ‘scope creep’, and it is always good to observe the operating system as the suspect would see it.
The effectiveness of booting the image in court or using screenshots of a virtualised image to highlight specific examination points such as drug paraphernalia used as Windows wallpaper, for example, can be invaluable in demonstrating a point. The method works for Linux and Windows, the Apple Mac guide for doing this is coming soon!
Primary reasons for Virtualising a Forensic Image
- To provide a better insight into how the accused used the system
- To run live forensic tools such as Nirsoft and OSforensics in the Windows environment
- To analyse the memory or RAM to see if any Malware or Rootkits only detectable on a live system exists
- To display user behaviour and layout of the desktop to clients
- To access bespoke tools such as QuickBooks or booking systems in their natural test environment
- To decrypt and create a logical image of non-TPM PGP, Bitlockered, Trucrypted or Veracrypted volumes where the password is known or to test techniques where one may have a limited amount of tries
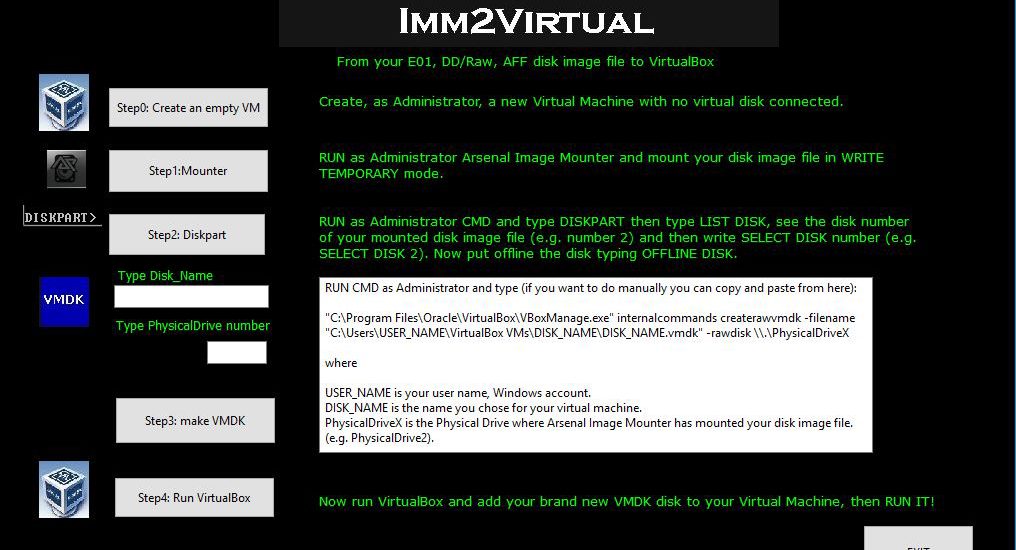
In the past, this has been costly or cumbersome. Recently a tool has been released free of charge, from Nanni Bassetti, the creator of Caine live suite of tools, called Imm2Virtual.
The technique relies on three tools, and you need a full forensic image for this to work. This technique is safe as the image, of course, won’t be blocked but also use a working copy to do this, don’t do this with the only copy of the evidence! Using this method all significant forensic image and RAW formats are supported (AFF, E01, E01x, DD, 001, IMG.)
WARNING: Make sure you disable internet access on yours or the virtual machine. You do not want to connect to illegal sites or even the suspect’s cloud or private websites. Without a subpoena, you are breaking the law!
Free Software Tools Needed to Download and Install on your Windows Forensic Machine
Steps to Making and Booting Your VDMK File
- Install or run ‘As Admin’ the items above. It is essential to run the programs above as admin otherwise disks won’t be visible and you will come across a whole host of other errors.

- Run Virtual Box as an administrator. Create a new virtual machine, using you suspect image types OS, but do not add a hard disk just yet. Remember to add more RAM to the virtual machine setup. Make a note of the path your VMDK machine was created. The default will be ‘C:\Users\YOURUSERNAME\VirtualBox VMs’.

- Run Arsenal Image Mounter as an admin. Mount the forensic image to allow temporary writes to the system cache, not the image! Take note of the physical disk number windows allocated to the virtually mounted disk.

- Select your search bar in Windows and search for CMD. Right-click and run a CMD Window as an administrator. Type DISKPART, then LIST DISK, check the disk number of your mounted disk and type SELECT DISK [INSERT NUMBER]. Now offline the disk by typing OFFLINE DISK.

- Now run IMM2VIRTUAL as an administrator. In the disk-name slot type the exact name that you called your disk and input your physical drive number. In this case, it is ‘5’, and the name was as stated earlier ‘VM1’.

- CMD should open a Window with ‘RAW host disk access VMDK file C:\Users\YOURUSERNAME\VirtualBox VMs\VM1\VM1.vmdk created successfully.’ If not you probably have the wrong disk number, name, you didn’t know offline the correct disk, or you didn’t run a program as admin.
- Now run VirtualBox as admin. Navigate to Settings>Storage. Add the modified VDMK file as a disk. You may need to play around with settings such as disk type, OS and RAM amount to get the virtual disk to boot. After some tinkering, you should be able to boot your image.

There you have it. Remember you can use iso’s such as Kon Boot or others to bypass the Windows. The beauty of it is if you mess up the installation you can go back to default settings as you are not modifying the original copy, just the cache.
If you liked this guide please like, share and comment on this page.