How to Create a Forensic Windows Based OS for Free for Forensic Imaging and Triage
- 04/06/2018
- Posted by: Alistair Ewing
- Categories: Computer Forensics, Software, Uncategorized
Introduction
This brief overview is designed for those with an IT background, students, forensic analysts or budding first responders. This will teach you the basics of how to create a Windows-based forensic OS for imaging and less commonly triage for free provided you own a valid Windows licence.
The consultancy Compute Forensics offers a worldwide three-day onsite first responder training in English and the Thai language for corporates, military and international police services. Those who have moderate computer literacy can be trained to triage and collect without affecting the original medium before handing over to a computer forensic expert or even the authorities. One should never start using self-made tools without testing.
Contact us for a quote in regards to training, collection or even an investigation.
We also offer a remote triage service, by sending a bootable drive with secure remote access software pre-installed we can forensically image a device from across the world without modifying the contents thus preserving the material.
I recommend the online training and exam from the forensic author, Brett Shavers. He runs an online course which you can find here.
Please be mindful this guide is for research purposes. Please test and use at your own risk!
Be mindful that specific software may be not allowed for use in corporate settings as you may break the software companies EULA agreement.
How Does a Forensic Windows OS Work?
If the build process completes correctly, a unique modified Windows is created on a USB drive, ISO or CD or DVD. When booting from a forensic OS, the BIOS of the host system bypasses the internal physical disk booting from the information on the USB drive (for Windows To Go) or the data saved to the volatile RAM transferred from the boot media (for Mini-WinFE.)
Windows should not mount the internal fixed disk but connected USB disks in the case of Windows To Go or any discs what so ever using WinFE.
Please note: When using DISKPART from CMD in Windows To Go you can mount Disks Read Only but NOT Volumes. Doing so writes to the disk. You can still image using Forensics or FTK Imager without doing any mounting. If you want to use specific triage tools in a blocked mounted state, you may need to bring the disk online, but remember never bring the Volume online. ALWAYS test your build.
Practice using Diskpart and the toggling of online and offline correct, many think they are smart using the command line, but one wrong move and you could wipe, format or mount a volume leaving you to explain your actions in an Expert Witness or corporate hearing.
Why Would I Need a Windows Based Forensic OS?
Other forensic OS’s exist as do physical writeblockers. Linux (Caine, Paladin, and others) and Mac formats (Sumuri’s Recon & BlackBag’s Macaquisition) can collect data, but I estimate 80% of forensic software is produced for Windows. Imagine being able to boot into Windows and use tools such as Netcat, FTK Imager, OSforensics or even full-blown FTK on your Bitlockered Frankenstein creation. This would enable you to carry a Swiss army knife of tools at your disposal.
Using a Windows Forensic OS you can:
- Collect data from software RAIDS and logically image the device rather than having to piece together physical images later saving time.
- Decrypt Bitlockereddrives and image/triage them in a decrypted state and physical state consecutively using CMD looking something like “manage-bde –unlock E: -recoverypassword 111111-222222-333333-444444-555555-666666-777777-888888.”
- Produce decrypted logical images on the fly from Truecrypt, PGP and Veracrypt using default Windows tools.
- Boot into your Bitlockered ‘Windows To Go’ and use your client’s hardware to attach to their domain with admin rights temporarily, run FTK to capture a suspects RAM and physical disk Image remotely without having to lug a laptop or even worse a workstation to the client’s site.
- Travel light with a few USB keys in different countries without lugging 20 pelican cases and getting stopped by airport security whom mistake the devices for dirty nuclear bombs.
- Use data recovery tools such as photorec without making changes to the drive.
- Triage and quickly find and capture forensically the information needed with only primary first responder training and no expensive equipment.
- Production of a log2timeline to capture users actions between specific dates.
- Windows2go could be sent to a client with a copy of Teamviewer or similar. With instructions and connected to the internet the client could boot into the forensic OS, an examiner from across the world can log in and take over the collection process going on to capturing the internal physical disk as an E01 to an encrypted drive. When complete the client can mail the item back for analysis saving on travel costs.
Forensic OS Route 1: Native to Enterprise ‘Windows To Go’
If you own a copy of Windows 10 Enterprise and you purchase one of the certified ‘Windows To Go’ drives (See Below) to make your OS. All you need to do is press the “Win Key& Q” together and type ‘Windows To Go’ into the search bar. Plug in your drive and follow the instructions. You will be asked if you want to Bitlocker the drive, it is recommended but be aware it may not boot on Mac’s or specific other systems.
Certified Windowstogo Drives
- Imation IronKey™ Workspace W300 / W500 / W700
- Kingston DataTraveler Workspace
- Spyrus Portable Workplace
- Spyrus Secure Portable Workplace
- Spyrus WorkSafe
- Super Talent RC4 / RC8
- WD My Passport Enterprise
- SanDisk Extreme CZ80 USB 3.0 Flash Drive
- SanDisk Extreme CZ88 USB 3.0 Flash Drive
Using Other Drives Including an M.2 SSD in a USB 3.1 Caddy
If you are a ‘Cheap Charlie’ or are feeling more adventurous, you can try other disks, although they are unsupported officially.
I tested a “SAMSUNG M.2 NGFF 128GB SSD SOLID STATE DRIVE MZ-NTE1280” (£40 from Amazon) inside a USB 3.1 “Type C To M.2 NGFF PCI-E SSD Hard Disk Case Enclosure 2242/2260/2280 caddy” (£10 pictured below.) When the enclosure arrived in the post, it looked like something out of a Christmas cracker. When I assembled the device, which took two minutes, I was pleased with how robust it felt. Windows To Go recognised the disk. Windows To Go was installed in about 10 minutes using the built-in GUI.
Speeds faster than the ‘certified’ drives were noted in tests at around 500mb a second read/write and use was not noticeably slower than using my native Crucial M.2 built into my high-end test laptop.

To use the newly created OS on a stick, you need to plug it into a computer and press whatever button you need to boot from your disk, not the internal drive (Esc, F11, F12, Delete.) On first boot, you will have to setup Windows just like any other new installation of Windows. Do not wait until you are on the client site!
Using DISKPART to Bring Disks Online
When you use Windows To Go any attached USB devices will be writable. The internal disks will be offline and unavailable to Windows. FTK Imager and other software will still be able to view, image and parse the internal drives. If you wish to Triage using other tools you may need to bring the disk online using disk manager or DISKPART in CMD as an admin. The command would be something like:
1) Run CMD as an admin
2) Type DISKPART
3) LIST DISKS
4) SELECT DISK 2 (2 being an example of the internal disk under review)
5) ONLINE DISK. The disk should then be shown in explorer but in a blocked state. Practice taking the disks offline and online using DISKPART before using this on evidence! You should be able to use Nirsoft and other live tools to analyse the internal disk without writing to it.

It is noteworthy to mention boot USB producing software Rufus produces Windows To Go but this has not been tested yet!
The downside to this method is that you need to learn the command prompt of DISKPART, this isn’t easy but not ideal for first responders. People with less Windows knowledge and whom want a cleaner smaller build should consider building a custom Mini-WinFE.
Forensic OS Route 2: Building your Own Custom Mini-WinFE
Using a GUI assembler and Windows installation media, it is possible to build a bootable OS in minutes that will have a GUI disk read/write toggler, can contain tools such as FTK Imager or DD and be under 300mb in size. This is enough to fit onto a writable CD or Mini CD (recommended for compatibility even old systems have CD drives) or even a dated 1.0 or 2.0 USB key.
The beauty of that is you can customise a stripped down version of Windows that can triage, is blocked using a GUI and that boots in seconds without all the ‘fluff’ the Windows To Go build contains.
Producing a Mini-WinFE is tricky, and if you add too many features you may end up bypassing the protection making the internal disks prone to changes, not good!
The secret is not to add too many features and test your creation on your system, not evidence.
Below is a step by step how-to produce your first basic 32-bit Forensic Mini-WinFE:
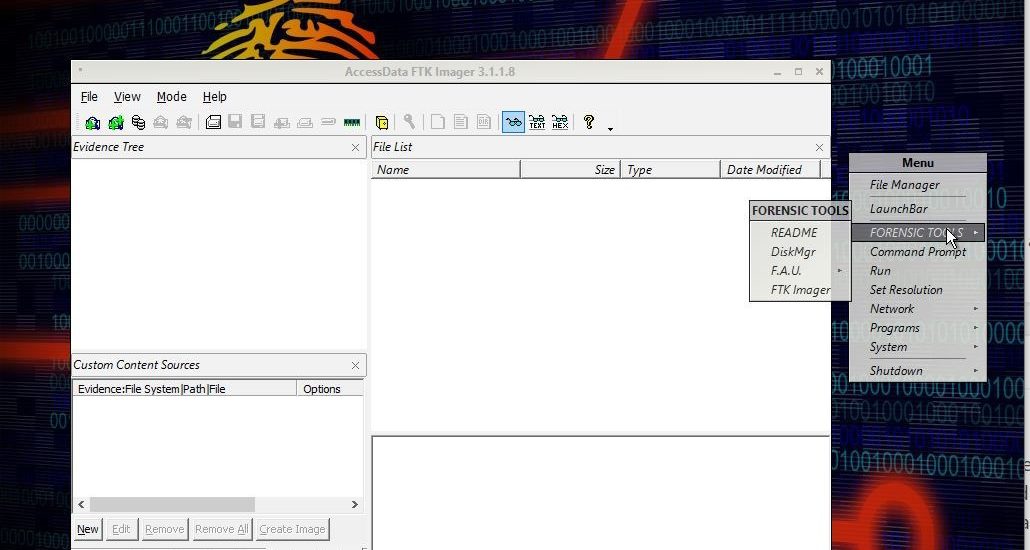
 (Above) Mini-WinFE’s GUI
- Download Mini-WinFE here or here.
- Extract the Zip to a clean directory and run the launcher inside the Mini-WinFE folder as an admin.
- Mount your Windows installation ISO or slip the DVD into your disk drive. I prefer 32-bit as it boots on both types of system. I used Windows 10 Enterprise as the Windows build.
- In settings point your source directory to your Windows DVD location or the folder you have dumped the contents of the Windows installation media.
- Create a working directory in the Mini-WinFE folder you just extracted and use this as your target directory.
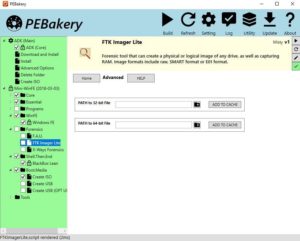
- Go to the FTK imager tab and point FTK to any 32-bit EXE. You can register and download Imager from here. I like to use version 3.1.1. A 64-bit version cannot be built into the cache for a 32-bit machine.
- In the ‘Path to 32-bit’ area press the folder button and select the FTK image EXE file you have installed or extracted.
- Option 1 allows you to select booting from FLAT or RAM. I would choose RAM; FLAT means the item boots from the medium and results in a larger ISO or USB output.
- Tick all the programs boxes except add custom batch and folders unless you wish to do this.
- Tick the create ISO tab and read the hover over suggestions.
- In the create ISO section option 3 the drop-down box allows a user to select the Firmware type. Older computers use BIOS (Basic Input Output System) newer have UFEI firmware and can ofter boot the older BIOS software or UFEI. There are three options; I would select the ‘both’ option if you are unsure.
- Select ‘oscdimg’ for an option.
- Change the optimise option to ‘yes’ for option 5. This will result in a smaller ISO.
- Selecting ‘yes’ for option 6 will build the ISO file in a newly created \mistyPR.Project.Output folder path in your project folder. Selecting ‘no’ will name the iso with the date and time to allow you to make multiple builds without writing over the older builds.
- Select the triangular ‘Play’ logo with the ‘Build’ tab underneath.
- If all goes well, you should have built your first forensic ISO. The file can be found in the output folder of your Mini-WinFE folder or the root of that folder.
- The ISO can be burnt to CD, Mini-CD or DVD, or you can also use Unetbootin or Rufus to make a bootable USB from the ISO.
- Sometimes a system won’t boot from a USB or not from sometimes a CD or DVD. Produce a few versions and label them.
- You will have to tinker to get different builds to boot on different systems. To work on my system, I had to enter the BIOS, change the boot from UFEI to legacy. Be careful on evidence that has a TPM chip linked BitLocker as you could end up rendering the drive unbootable by disabling TMP in the BIOS.
- Be sure to photograph the Bios when working with real evidence. In the boot setup of the BIOS take all the internal disks offline and have your forensic USB followed by CD/DVD in the boot order.
- If the process works, you will be greeted by the disk manager, and this shows you which disks you can make writable or bring online for triage. Be careful not to bring the evidence volumes online. You can right click to find out more about the disk to make sure you make the correct selection. You don’t need to bring a disk online to image it though.
- Closing the file manager window results in a forensic desktop being displayed.
- Right-clicking on the desktop displays the drop-down menu in which you can scroll through and make utilisation of the differing tools.
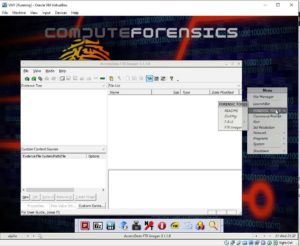
- Below displays a screenshot of the ISO successfully running in a test virtual box environment.
 Please Like or Share this guide should you find it useful!